

Personalizing content for your contacts can increase engagement with your website and email campaigns. You can personalize your emails, chatbots, chat prompts, conversation snippets and forms with any contact property or custom property.
This guide is designed to educate you on how to personalize your email content using Liquid tags in Gist. We'll explain how these tags work and provide examples to illustrate the process, ensuring you understand the feature's full scope.
- Understanding Liquid Tags
- Understanding Operators
- Using Common Filters
- Creating Dynamic Content with Liquid
- Implementing Conditional Logic with Liquid
- Real-world Examples of Personalized Emails
- Common Questions
Understanding Liquid Tags
Liquid tags are used to insert dynamic elements into your emails, which are typically written in HTML. These tags act as placeholders within your content and are replaced with actual data from your Gist workspace just before the message is dispatched.
Remember, always preview and test your emails using Gist's "Preview as" feature before launching your campaign.
Contact Object
To include a default or custom contact property in an email, you need to use the syntax {{ contact.PROPERTY_NAME }}. For example, if you want to include the first name, you would use the tag:
{{ contact.first_name }}.
As you can see, anything you've included as a contact property should start with contact. before your property name. For example, to insert the contact's country, you would use {{ contact.country }}.
Filters and Tags
Liquid filters and operators form the core of Liquid. They allow you to modify your tags' output, such as capitalizing the first name {{ contact.first_name | capitalize }} or displaying just the first name when the full name is given {{ contact.full_name | split: " " | first }}.
Let's explore some commonly used filters, and operators, and how to utilize them to create more engaging emails.
Understanding Operators
Operators are used in Liquid to perform operations such as comparison and logical operations. They work with if, elsif, else, and unless tags. Here are some operators you may use:
- ==: Checks if the values on either side are equal.
- !=: Checks if the values on either side are not equal.
- <: Checks if the value on the left is less than the one on the right.
- <=: Checks if the value on the left is less than or equal to the one on the right.
- >: Checks if the value on the left is greater than the one on the right.
- >=: Checks if the value on the left is greater than or equal to the one on the right.
- and: Checks that both conditions are true.
- or: Checks if at least one of the conditions is true.
- contains: Checks for a substring within a string or an array.
Here is an example of using the operator contains:
{% if contact.tags contains "vip" %}
Welcome, valued VIP member!
{% endif %}
In this example, the email will include the greeting "Welcome, valued VIP member!" only for contacts with the tag 'vip'.
Using Common Filters
Filters are used in Liquid to manipulate the output of an object. Here are some of the most commonly used filters and how they can be used for email personalization:
Text Manipulation:
1. default
The default filter allows you to set a default value for a variable if it is undefined, null, or false.
Example:
{{ contact.first_name | default: "Customer" }}Output: If the contact.first_name variable is not defined or is null or false, it outputs Customer.
2. capitalize
The capitalize filter makes the first letter of a string uppercase and the rest lowercase.
Example:
{{ "hello world" | capitalize }}
Output: Hello world
3. downcase
The downcase filter converts a string to lowercase.
Example:
{{ 'Gist' | downcase }}Output: gist
4. upcase
The upcase filter converts a string to uppercase.
Example:
{{ 'gist' | upcase }}
Output: GIST
5. strip
The strip filter removes any leading and trailing whitespaces from a string.
Example:
{{ " Hello, world! " | strip }}Output: Hello, world!
6. replace
The replace filter replaces every occurrence of a specified substring with another within a string.
Example:
{{ 'Hello Gist' | replace: 'Gist', 'World' }}
Output: Hello World
7. prepend
The prepend filter adds a specified string at the beginning of another string.
Example:
{{ 'API' | prepend: 'Gist ' }}
Output: Gist API
8. append
The append filter concatenates a specified string at the end of another string.
Example:
{{ 'Gist' | append: ' API' }}
Output: Gist API
9. size
The size filter returns the number of characters in a string or the number of items in an array.
Example:
{{ "Gist" | size }}
Output: 4
10. truncate
The truncate filter shortens a string down to a number of characters and appends an ellipsis (...) if the string is truncated.
Example:
{{ "Hello, world!" | truncate: 5 }}Output: Hello...
11. split
The split filter divides a string into an array using a separator string.
Example:
{{ "apple,banana,carrot" | split: "," }}Output: ["apple", "banana", "carrot"]
12. escape
The escape filter escapes a string, replacing any characters that have special meaning in HTML or other markup languages.
Example:
{{ "<Hello, world!>" | escape }}Output: <Hello, world!>
13. remove
The remove filter removes every occurrence of a specified substring within a string.
Example:
{{ 'Hello Gist' | remove: ' Gist' }}
Output: Hello
14. url_encode
The url_encode filter encodes a string into a format that can be safely included in a URL.
Example:
{{ "Hello, world!" | url_encode }}Output: Hello%2C%20world%21
15. url_decode
The url_decode filter decodes a URL-encoded string.
Example:
{{ "Hello%2C%20world%21" | url_decode }}Output: Hello, world!
Array Manipulation:
1. first
The first filter outputs the first element of an array.
Example:
{{ 'Gist, Messenger, Email' | split: ', ' | first }}
Output: Gist
2. last
The last filter outputs the last element in an array.
Example:
{{ "Gist, Messenger, Email" | split: ", " | last }}
Output: Email
3. join
The join filter combines the elements of an array into a string using a separator string.
Example:
{{ "apple,banana,carrot" | split: "," | join: " and " }}Output: apple and banana and carrot
4. sort
The sort filter arranges the elements of an array in alphabetical or numerical order.
Example:
{{ "apple, orange, banana" | split: ", " | sort }}
Output: ["apple", "banana", "orange"]
5. reverse
The reverse filter reverses the order of the elements in an array. It can also be used to reverse the characters in a string.
Example (for array):
{{ "apple,banana,carrot" | split: "," | reverse | join: ", " }}Output: carrot, banana, apple
Example (for string):
{{ "Hello, world!" | reverse }}Output: "!dlrow ,olleH"
6. concat
The concat filter concatenates (joins) two arrays together.
Example:
{{ "apple,banana" | split: "," | concat: "carrot,dog" | split: "," | join: ", " }}Output: apple, banana, carrot, dog
7. uniq
The uniq filter removes any duplicate elements in an array.
Example:
{{ "apple, orange, banana, apple" | split: ", " | uniq }}
Output: ["apple", "orange", "banana"]
Mathematical Operations:
1. plus
The plus filter adds a number to another number.
Example:
{{ 4 | plus: 6 }}
Output: 10
2. minus
The minus filter subtracts a number from another number.
Example:
{{ 5 | minus: 2 }}
Output: 3
3. times
The times filter multiplies a number by another number.
Example:
{{ 5 | times: 2 }}
Output: 10
4. divided_by
The divided_by filter performs integer division.
Example:
{{ 20 | divided_by: 4 }}
Output: 5
5. ceil
The ceil filter rounds an input up to the nearest whole number.
Example:
{{ 4.6 | ceil }}
Output: 5
6. floor
The floor filter rounds an input down to the nearest whole number.
Example:
{{ 4.6 | floor }}
Output: 4
7. round
The round filter rounds a number to the nearest integer or, if a number is passed as a parameter, to that number of decimal places.
Example:
{{ 4.678 | round: 2 }}
Output: 4.68
Date and Time:
1. date
The date filter reformats a timestamp into a human-readable date format.
Example:
{{ 'now' | date: "%B %-d, %Y" }}
Output: June 13, 2023 (or the current date)
| Input | Output |
|---|---|
| {{ contact.collection_date }} | 1544268600 |
| {{ contact.collection_date | date: “%e %B %Y” }} | 12 August 2018 |
| {{ contact.collection_date | date: “%A %e %B” }} | Sunday 12 August |
| {{ contact.collection_date | date: “%D” }} | 12/08/2018 |
| {{ contact.collection_date | date: “%v” }} | 12-Aug-2018 |
Creating Dynamic Content with Liquid
Converting Timestamps to Human-Readable Dates
In certain scenarios, your contact properties might be stored as timestamps, which are not easy to read or comprehend for an average user. A common example of this is a trial expiration date. Liquid tags provide you with a way to convert these timestamps into human-readable dates.
For instance, let's say you have a timestamp property called "trial_end_at" which represents the trial expiration date. Here's how you can convert it into a more user-friendly format:
{{ contact.trial_end_at | date: "%B %-d, %Y" }}
In the above Liquid tag, "%B %-d, %Y" is the formatting option that instructs Liquid on how you want the date to be displayed. This particular format results in dates like "July 31, 2023". If you wanted a different format, say "31/07/2023", you could achieve that using "%d/%m/%Y".
To display the current date, you can use:
{{ 'now' | date: "%B %-d, %Y" }}
Calculating Remaining Trial Days
There may be occasions when you wish to inform your contacts about the duration left in a trial period. In such cases, you can use Liquid tags to compute the remaining days by subtracting the current date from the trial end date, both in UNIX timestamp format.
Here is an example of how you can accomplish this:
{% assign current_date = 'now' | date: '%s' %}
{% assign trial_end = contact.trial_end %}
{{ trial_end | minus: current_date | divided_by: 86400 }}
In the above example,
- First, we get the current epoch time using
'now' | date: "%s". - Next, we store the trial_end date (in UNIX timestamp) in a variable.
- Lastly, we subtract the current date from the trial end date and divide the result by 86400 (number of seconds in a day) to get the number of days remaining. This operation performs integer division so that the result will be rounded down.
Custom Messages Based on Day of Week
If you wish to customize your email content based on the day of the week, Liquid tags can help you do that. This is especially useful for sending day-specific greetings or offers to your contacts.
Here's an example of how to display a different message for Fridays compared to other days of the week:
{% assign current_day = 'now' | date: '%A' %}
{% if current_day == 'Friday' %}
Have a great weekend!
{% else %}
Cheers,
{% endif %}
In the example above, we first determine the current day of the week with 'now' | date: '%A', and then use an if condition to check if it's Friday. If it is, "Have a great weekend!" is displayed. If it's any other day, "Cheers," is displayed instead.
Looping Through Properties
There may be situations when you need to process a list of values for a property. For instance, if you have a list of friends for each contact and you want to display this list in the email. Liquid tags offer a simple way to iterate over these values using a for loop.
Consider the following scenario: in your Gist contact data, each person has a list of friends identified by the property friends, like so:
gist.identify({
 email: "user@example.com",
 friends: "Elaine, George, Kramer"
});
To display this list in your email, you can use a Liquid for loop like this:
{% assign friends = contact.friends | split: ", " %}
{% for friend in friends %}
 {{ friend }}<br/>
{% endfor %}
The split: ", " filter breaks the friends string into a list of individual names. The for loop then iterates over this list, and {{ friend }} inserts each name into the email.
As a result, the output in your email will appear as:
Elaine
George
Kramer
Generating Dynamic Links
You can also include properties within links to redirect your contacts to a custom page:
<a href="https://www.yoursite.com/{{contact.PROPERTY_NAME}}">
Implementing Conditional Logic with Liquid
Creating Fallbacks for Missing Data
When dealing with personalized email content, not all your contacts will have a value stored for every property. In such cases, you need to provide a "fallback" or default response to ensure your content appears polished and professional.
For instance, if you're trying to include a custom property like "pet_name" but it's not available for a specific contact, you can set a fallback like so:
{% if contact.pet_name != blank %}
 Hi {{ contact.pet_name | capitalize }},
{% else %}
 Hi there,
{% endif %}
Here, if the contact doesn't have a pet (thus "pet_name" is undefined), the greeting defaults to "Hi there".
Displaying Conditional Content
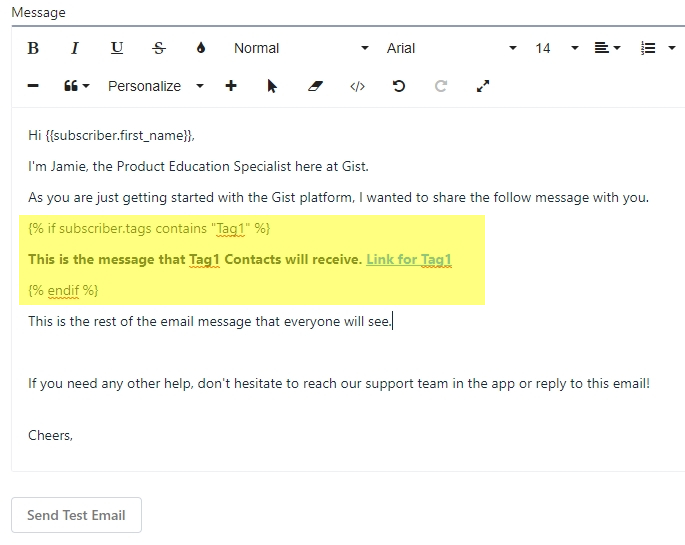
Liquid tags offer you the flexibility to display customized content to different contacts based on certain conditions, such as tags associated with them. For instance, if you want to send a specific message to contacts who have a certain tag on their profile, you can do so using if conditions in Liquid tags.
Here's an example:
{% if contact.tags contains 'tag1' %}
This text will be sent to Contacts with the "tag1' tag on their profile.
{% endif %}
In this example, the content "This text will be sent to Contacts with the 'tag1' tag on their profile." will only be displayed in emails sent to contacts who have 'tag1' assigned as a tag in their Gist contact profile.
This method can be used to create highly personalized emails based on the unique attributes (tags) of your contacts.
The Power of "Unless" in Liquid
The 'Unless' tag in Liquid is a conditional statement, much like the 'If' tag, but it works in reverse. When you use 'Unless', you're telling Liquid to render the content only if the condition is not met or if it's false.
Consider this as a template to understand the 'Unless' tag's functionality:
{% unless condition %}
This will display if the condition is not met.
{% else %}
This will display if the condition is met.
{% endunless %}
Here's an example with a more practical application. Let's say you want to display a special message to contacts who haven't provided their first name:
{% unless contact.first_name %}
Hello there! It seems like we don't know your name yet. Update your profile to tell us.
{% else %}
Hello {{ contact.first_name }}! How can we assist you today?
{% endunless %}
In this scenario, if the contact's first name isn't provided (making contact.first_name false), they'll receive the first message. If the name exists (making contact.first_name true), they'll receive a personalized greeting instead.
By leveraging the 'Unless' tag, you can add more dynamic content to your emails based on the specific conditions that are (or are not) met by the contact's data.
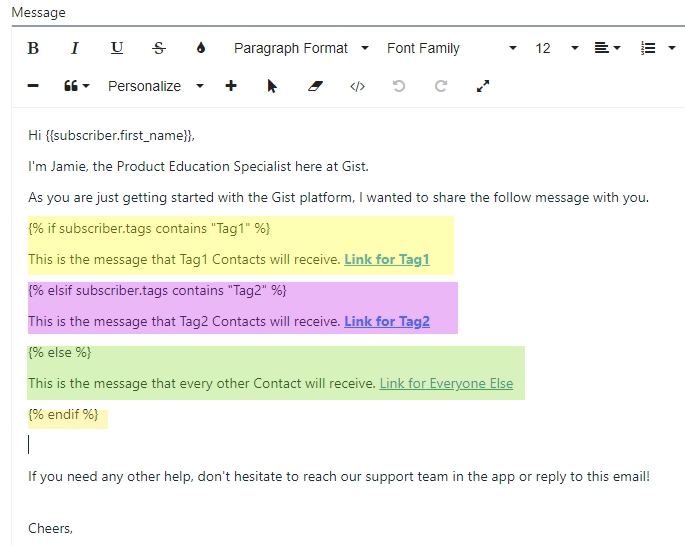
Implementing Complex Conditions
One of the powerful aspects of Liquid tags is the ability to incorporate multiple conditions into your emails. This means you can draft a single email, and different contacts will receive different content depending on their respective property values.
Let's use an example to illustrate how this works:
{% if contact.tags contains "tag1" %}
This text will be sent to Contacts with the "tag1' tag on their profile.
{% elsif contact.tags contains "tag2" %}
This text will be sent to Contacts with the "tag2' tag on their profile.
{% else %}
This text will be sent to Contacts that do not have "tag1" or tag2" on their profile.
{% endif %}
In this example, three different email versions are created based on the tags associated with the contacts. Contacts with 'tag1' will receive the first message, contacts with 'tag2' will receive the second message, and all other contacts (those without 'tag1' or 'tag2') will receive the third message.
This powerful feature allows you to tailor your communication based on the properties of your contacts, enhancing the personalization and effectiveness of your campaigns.
Real-world Examples of Personalized Emails
Discount Based on Customer Type
Let's say you have different tiers of customers, and you want to offer a different level of discount to each tier. You can achieve this using conditional tags.
{% if contact.tier == 'gold' %}
Enjoy your exclusive 30% discount as a Gold Member!
{% elsif contact.tier == 'silver' %}
As a thank you for being a Silver Member, enjoy this 20% discount!
{% else %}
Welcome! Here's a 10% discount to get you started.
{% endif %}
Depending on the customer's tier, the email will include a different discount message.
Birthday Wishes
If you have the birthdate of customers stored in a contact property, you can send them personalized birthday greetings.
{% if contact.birthday | date: "%m-%d" == 'now' | date: "%m-%d" %}
Happy Birthday {{ contact.first_name }}! Here's a special birthday gift just for you.
{% endif %}
This checks if the current date matches the contact's birthday, and if it does, a birthday message is included in the email.
Location-Specific Content
If you have customers from different locations, you can customize your email content based on their location.
{% if contact.location == 'USA' %}
We are excited to announce free shipping across the USA!
{% elsif contact.location == 'Canada' %}
Hey Canadian friends! We're offering a special deal just for you.
{% else %}
We are expanding globally. Stay tuned for exciting offers near you.
{% endif %}
Here, the message in the email will change based on the contact's location.
Recommended Products
You can tailor product recommendations based on customer interests.
{% if contact.interests contains 'Books' %}
We have these amazing new book releases you'll love.
{% elsif contact.interests contains 'Electronics' %}
Check out these cool gadgets we've just stocked up on.
{% else %}
We've got something for everyone. Explore our wide range of products.
{% endif %}
This email content changes based on the interests of the contact, making the recommendations more relevant.
Past Purchase Follow-up
If your customers have made purchases in the past, you can follow-up with related products or a thank you message.
{% if contact.last_purchased %}
We hope you're loving your {{ contact.last_purchased }}. Here are some accessories that go perfectly with it.
{% else %}
Noticed something you liked? Here's a 10% off coupon to make your first purchase even sweeter.
{% endif %}
This checks if the contact has purchased in the past and suggests complementary products or incentives for the first purchase.
Event Reminder
If you're hosting events and your subscribers have signed up for them, you can send personalized reminders.
{% if contact.event_name %}
Just a reminder that {{ contact.event_name }} is happening on {{ contact.event_date | date: "%A, %B %d, %Y" }}. We can't wait to see you there!
{% else %}
We host events frequently. Stay tuned so you don't miss out on the next one!
{% endif %}
Depending on whether a subscriber has signed up for an event, this email will serve as a reminder or an invitation to stay updated for future events.
Membership Expiration
If you run a subscription service, you can remind subscribers when their membership is about to expire.
{% if 'now' | date: "%Y-%m-%d" == contact.membership_expiry_date | date: "%Y-%m-%d" %}
Hi {{ contact.first_name }}, just a reminder that your membership expires today. Click here to renew.
{% endif %}
This email is triggered when the subscriber's membership expiration date matches the current date, reminding them to renew.
These examples show how liquid tags can be used to create dynamic content that adapts to the attributes of each contact. The idea is to make each email more relevant and personalized to the recipient, thereby increasing engagement and conversion rates.
Common Questions
How can I use Liquid tags to incorporate a countdown to a specific event in my emails?
A: You can create a countdown by subtracting the current date from the event date using the minus filter. Here's an example:
{% assign countdown = contact.event_date | minus: 'now' | date: "%j" %}
Just {{ countdown }} days until our big event!
This will display the number of days left until the specified event.
Can I use Liquid to encode URL parameters for links in my email?
A: Yes, you can use the url_encode filter. This filter replaces special characters in a string so it can be safely included in a URL. For example:
Click <a href="https://mywebsite.com/search?query={{ contact.last_search | url_encode }}">here</a> to see similar products.
This snippet would take the customer's last search query, URL encode it, and insert it into a URL.
Is it possible to use Liquid to determine the amount of time that has passed since a certain date, like a customer's last purchase?
A: Yes, you can use the minus filter to determine the difference between two dates. Here's an example:
{% assign days_since_last_purchase = 'now' | minus: contact.last_purchase_date %}
It's been {{ days_since_last_purchase }} days since your last purchase. Time for some new goodies!
This will display the number of days since the customer's last purchase.
Can I use Liquid to implement A/B testing in my emails?
A: Yes, you can use Liquid to create dynamic content for A/B testing. For example, you could use the modulo operator to divide your recipients into two groups:
{% if contact.id | modulo: 2 == 0 %}
Here's variant A of our special offer!
{% else %}
Here's variant B of our special offer!
{% endif %}
This example would send variant A of an offer to customers with even IDs, and variant B to customers with odd IDs.
Q6: Is it possible to use Liquid to format numeric values, like prices, in a more readable format?
A: Yes, you can use the money filter, if your platform supports it, to format numeric values as monetary amounts. For example:
That's a total savings of {{ contact.savings | money }}!
This snippet would format the value of the savings variable as a monetary amount (e.g., $10.00).
Remember, the key to effective personalization is relevance and making each contact feel like your content is tailor-made for them. Happy personalizing!
Need Help?
If you have any further questions, please start a Live Chat. Just "Click" on the Chat Icon in the lower right corner to talk with our support team.